Monday, October 29, 2012

Slow-Cooker Green Chile with Pork


There are as many recipes for Green Chile as there are green chili cooks. Green chile, or chile verde, is a versatile comfort food at our house.  

This year, we bought a half a pig from a young man that raises pigs for 4-H. He (the young man) also used his money from this pig to install a flag pole to complete his Eagle project for Boy Scouts. So the pig not only fulfilled his role as something tasty on the dinner table, but contributed to a great cause. 

I grilled a pork roast the other night for dinner – this was a great roast, but way too much for Walt and me to finish in one or even two meals. On night three, I was desperate. There are a few things to do with leftover pork roast and green chile is at the top of our list. 

I also had some tomatoes that had finally turned red, some chopped red onions that needed used, and some roasted chilies in the freezer. Now we’re talking! There’s no real recipe, then, to this post, just use what you have on hand. And did I mention that this is SO easy?

Slow Cooker Green Chile With Pork:

Cut the fat, gristle and bone off the pork roast. Cut the meat in bite-size pieces and place in the bottom of the slow cooker. 


Chop up one or two red onions and put on top of the meat. 


Dice some roasted green chiles, according to taste. I made this batch a little hotter than usual with some little yellow chiles add to the mix. 


Mince 3-4 garlic cloves and add to the slow cooker. 


Dice a few tomatoes and place on top of everything. 


Pour about 4 cups of low sodium chicken broth over the ingredients. 


Cover and cook on low about six hours. 

This is where I run out of pictures – sorry about that! 

Peel and dice 3-4 potatoes, add to the slow cooker, stir. Yukon Gold potatoes are wonderful because they hold their shape in a recipe like this. Add additional chicken broth if it’s getting dry. Turn slow cooker to high. 

Cook another hour. Add salt and pepper to taste. Serve with fresh tortillas. 

Again, we couldn’t wait to eat this tasty chile so I forgot the final picture. It was good. Very good.


Saturday, October 27, 2012

The Perfect Chocolate Chip Cookie


Really? Pretty close. I am constantly on the lookout for the perfect chocolate chip cookie. This recipe came from the Cook’s Illustrated All Time Best Recipes magazine. You can find all the whys and whatnots about the sugars, the eggs, the butter, the science and all on their website. I learned a lot from reading about making these cookies.

These aren’t made with the typical cream-the-butter-and-sugars-add-the-flour method. You melt the butter, use more brown sugar, and use a whisk instead of a mixer.

The result? A cookie that’s chewy in the center, crispy on the edges, with a lovely toffee flavor. I did tweak the amount of chocolate chips and used some whole wheat flour with the white flour. I also doubled the recipe because I LOVE chocolate chip cookies and I need some in the freezer.

The Perfect Chocolate Chip Cookie (if you want to double the recipe, the amounts are in parentheses)

1 ¾ (3 ½) cup all-purpose flour
½ (1) tsp. baking soda
14 (28) tbs. unsalted butter (that’s 1 cup minus 2 tablespoons if you use the 14 tbs. And unsalted is important)
¾ (1 ½) cup packed dark brown sugar (use fresh, moist brown sugar instead of hardened brown sugar which will make the cookies dry)
½ (1) cup granulated sugar
1 (2) tsp. salt
2 (4) tsp. vanilla
1 (2) large egg plus 1 (2) egg yolk
1 ¼ (2 ½) c. semisweet chocolate chips or chunks (I used 3 ½ c. mixed chips – milk, white, semisweet, and peanut butter)
¾ (1 ½) c. pecans or walnuts, toasted and chopped (optional) 


Adjust oven rack to middle position and heat oven to 375 degrees. Line baking sheets with parchment paper (definitely – you don’t want the chemical taste of cooking spray). Whisk flour and baking soda together in bowl and set aside. 


Melt 10 (20) tablespoons butter in a 10” skillet over medium-high heat (avoid using a nonstick skillet to brown the butter; the dark color of the nonstick coating makes it difficult to gauge when the butter is sufficiently browned).  
 
These are in chunks because I made unsalted butter the other day


 Continue cooking, swirling pan constantly, until butter is dark golden brown and has nutty aroma, 1 to 3 minutes (if you make butter toffee, it’s the same nice brown color and aroma). Transfer browned butter to large heatproof bowl. Add remaining 4 (8) tablespoons butter and stir until completely melted (I poured the hot melted butter over the remaining butter).  


Add brown sugar, granulated sugar, salt (it helps if this is already measured into a separate bowl) and vanilla to melted butter; whisk until fully incorporated.
 
 
Add egg and yolk (I used fresh eggs and they are smaller so I used an extra egg yolk); whisk until mixture is smooth with no sugar lumps remaining, about 30 seconds.


Let mixture stand for 3 minutes (so the sugar dissolves), then whisk for 30 seconds. Repeat process of resting and whisking 2 more times until mixture is thick, smooth, and shiny. Using rubber spatula, stir in flour mixture until just combined, about 1 minute.


Stir in chocolate chips and nuts, if using. Give dough final stir to ensure no flour pockets remain and ingredients are evenly distributed. 


Working with 3 tablespoons of dough at a time, roll into balls and place 2 inches apart on prepared baking sheets (this is where I tweaked it a bit too. I think the cookies are too big with 3 tbs. of dough, so I used 2 tablespoons. You don’t want to make them too small though, or they will lose the chewy texture that makes them so yummy).  


Bake 1 sheet at a time until cookies are golden brown, still puffy and edges have begun to set but centers are soft – 10 to 14 minutes (it only took 10 minutes in my lower oven and 9 minutes in my upper oven), rotating (turning) baking sheet halfway through baking. Transfer baking sheet to wire rack; let cookies cool. Or let them cool 2 minutes, remove them to wire racks.  

Note the crackly texture on the top - you want this because you don't want a cakey texture

If you don’t double it and use the full 3 tablespoons of dough, you’ll get about 16 cookies. I used 2 tablespoons, doubled the recipe and got 48 or 4 dozen cookies.  

Cool to room temperature before serving (that’s the recipe’s recommendation – I suggest you get a glass of milk and have at it!)

Thursday, October 25, 2012

Brownie Pudding Cake


Beth made this at the cabin while we were elk hunting – it’s quick, easy, and warm when you are done with dinner.

When we got home from hunting, I had to make it again. Only, I made a double batch – you can’t have too much of a good thing. The cayenne is my own addition – it gives it a little kick, but the recipe is fine if you leave it out.

Brownie Pudding Cake 

¾ c. flour
¾ c. granulated sugar
1 ½ tsp. baking powder
½ tsp. baking soda
¼ tsp. salt
¼ tsp. cinnamon
¼ tsp. cayenne (optional)
1/3 cup plus ¼ c. unsweetened cocoa powder
½ c. milk
3 tbs. melted butter
1 ½ tsp. vanilla
½ c. firmly packed brown sugar
1 ¾ c. boiling water
Powdered sugar
 
Preheat oven to 350 degrees. Grease a 9” square baking dish or round soufflĂ© dish. Combine flour, granulated sugar, baking powder, soda, salt, cinnamon, cayenne (if desired), and 1/3 cup cocoa in a medium bowl. Add milk, butter and vanilla; stir until just blended. Spoon the batter into the prepared dish.


Combine brown sugar and remaining ¼ cup cocoa in a small bowl. Sprinkle evenly over batter. Pour boiling water over entire mixture; do not stir.

Bake 35-38 minutes, until a toothpick inserted into the top layer comes out clean. Cool at least 10 minutes. Sprinkle with powdered sugar before serving.


I got so excited to eat this, I forgot to take a close-up picture! Enjoy!

Sunday, October 21, 2012

Pumpkin Roll Cake


For a cake that doesn’t come in a box, this is about as easy a cake as you can make. And it just screams Fall! Pumpkins! Spices! Yummy! I put this in the pumpkin recipes last fall, but here are some pictures to go along with it.


PUMPKIN ROLL CAKE


Beat 3 eggs for 3 minutes.
 
 
Add 1 c. sugar.
 
 
Beat in 2/3 c. pumpkin and 1 tsp. lemon juice.
 
 
Stir in:
¾ c. flour
2 tsp. cinnamon  
½ tsp. salt
½ tsp. nutmeg
1 tsp. baking powder 


Prepare a greased and floured cookie sheet, or a cookie sheet lined with parchment paper and sprayed with cooking spray.  

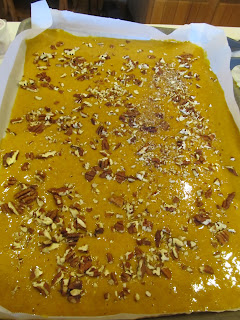
Pour the batter on the cookie sheet.
 
 
Sprinkle with 1 ½ cups chopped nuts.
 
 
Or leave off the nuts. Bake at 375˚ for 10-15 minutes.  


Cool 5 minutes. Turn out onto towel sprinkled with powdered sugar.


Roll up. Cool 30 minutes.


 Unroll and frost with:
1 c. powdered sugar
¼ c. butter
6 oz. cream cheese
½ tsp. vanilla    

Beat together and spread on cake.


Roll up, using the towel to start it rolling.
 
 
Sprinkle with powdered sugar.

 
Even though I’ve had this recipe forever, it’s just a wonderful fall cake and is worth making every year. So I made two! Enjoy!

Wednesday, October 17, 2012

Ground Beef Tacos


Tacos – fry up some ground beef, add a seasoning packet, chop some lettuce and tomatoes, and open a package of taco shells. Right? Well, I thought that too until I tried this recipe from Cook’s Illustrated. They explain why lean beef is better, why you use tomato sauce and vinegar, and why iceberg lettuce is best in tacos. But I just found this takes regular ol’ tacos to a whole new level. The extra time with the meat is truly worth it – these are great tacos!
 
Ground Beef Tacos

Meat filling:
2 tsp. vegetable oil or corn oil
1 small onion, chopped fine
3 garlic cloves, minced
2 tbs. chili powder
1 tsp. ground cumin
1 tsp. ground coriander
½ tsp. dried oregano
¼ tsp. cayenne pepper
Salt and pepper
1 lb. 90% lean ground beef (I used our mixture of ground elk and antelope)
½ c. canned tomato sauce
½ c. chicken broth
2 tsp. cider vinegar
1 tsp. brown sugar

Heat oil in skillet over medium heat until shimmering – about 2 minutes.  Add onion and cook, stirring occasionally, until softened, about 4 minutes.
 
 
Add garlic, chili powder, cumin, coriander, oregano, cayenne, and ½ tsp. salt; cook stirring constantly until fragrant, about 1 minute.


Add ground meat and cook, breaking meat up and scraping pan bottom to prevent scorching, until beef is no longer pink – about 5 minutes.
 
 
Add tomato sauce, broth, vinegar and sugar; bring to simmer.
 
 
Reduce heat to medium-low and simmer, uncovered, stirring frequently and breaking up meat, unto liquid has reduced and thickened (mixture should not be completely dry), about 10 minutes.
 
 
Season with salt and pepper to taste.

You can fry some corn tortillas (recommended) or fry a flour tortilla and serve these tostada style.


Suggested toppings:
Cheddar cheese
Monterey Jack cheese
Pepper Jack cheese
Shredded iceberg lettuce
Chopped fresh tomatoes
Sour cream
Avocado
Chopped onion
Minced cilantro
Hot sauce 


Oh, yum! Such a wonderful, easy, comfort meal!